eyebrow shapingSana Malik6 min read
The Complete Eyebrow Shaping Guide: Shape, Define, Fill
Learn how to shape your eyebrows in 3 steps: find your ideal shape, choose a hair removal method, and fill with makeup. Expert tips included.

Your eyebrows frame your entire face. A well-shaped pair can lift your features, sharpen your look, and boost your confidence, but knowing where to start is half the battle. This guide breaks the process into three clear steps so you can groom your brows like a professional, at home or with a little help from your brow artist.
Three Steps, That's It
- Step 1 (Shape): Use the pencil trick to map your brow head, arch, and tail based on your unique bone structure.
- Step 2 (Define): Remove stray hairs using threading, tweezing, or waxing. Threading offers the best precision for brows.
- Step 3 (Fill): Use pencil and powder to fill sparse areas with natural-looking, hair-like strokes.
Step 1: Find Your Ideal Brow Shape
Before you touch a single hair, you need a blueprint. Your ideal brow shape is guided by your face shape, natural growth pattern, and bone structure. The goal is not to create a new shape from scratch but to enhance what you already have.
Brow Anatomy
Every brow has three key landmarks:
- Brow head: Where the brow begins, near the bridge of the nose. More fullness here creates a bolder look.
- Arch: The highest point of the brow. A higher arch reads as more expressive; a lower, softer arch looks more natural.
- Tail: Where the brow ends. A tail that extends too far can drag your features down, while one that is too short can look unfinished.
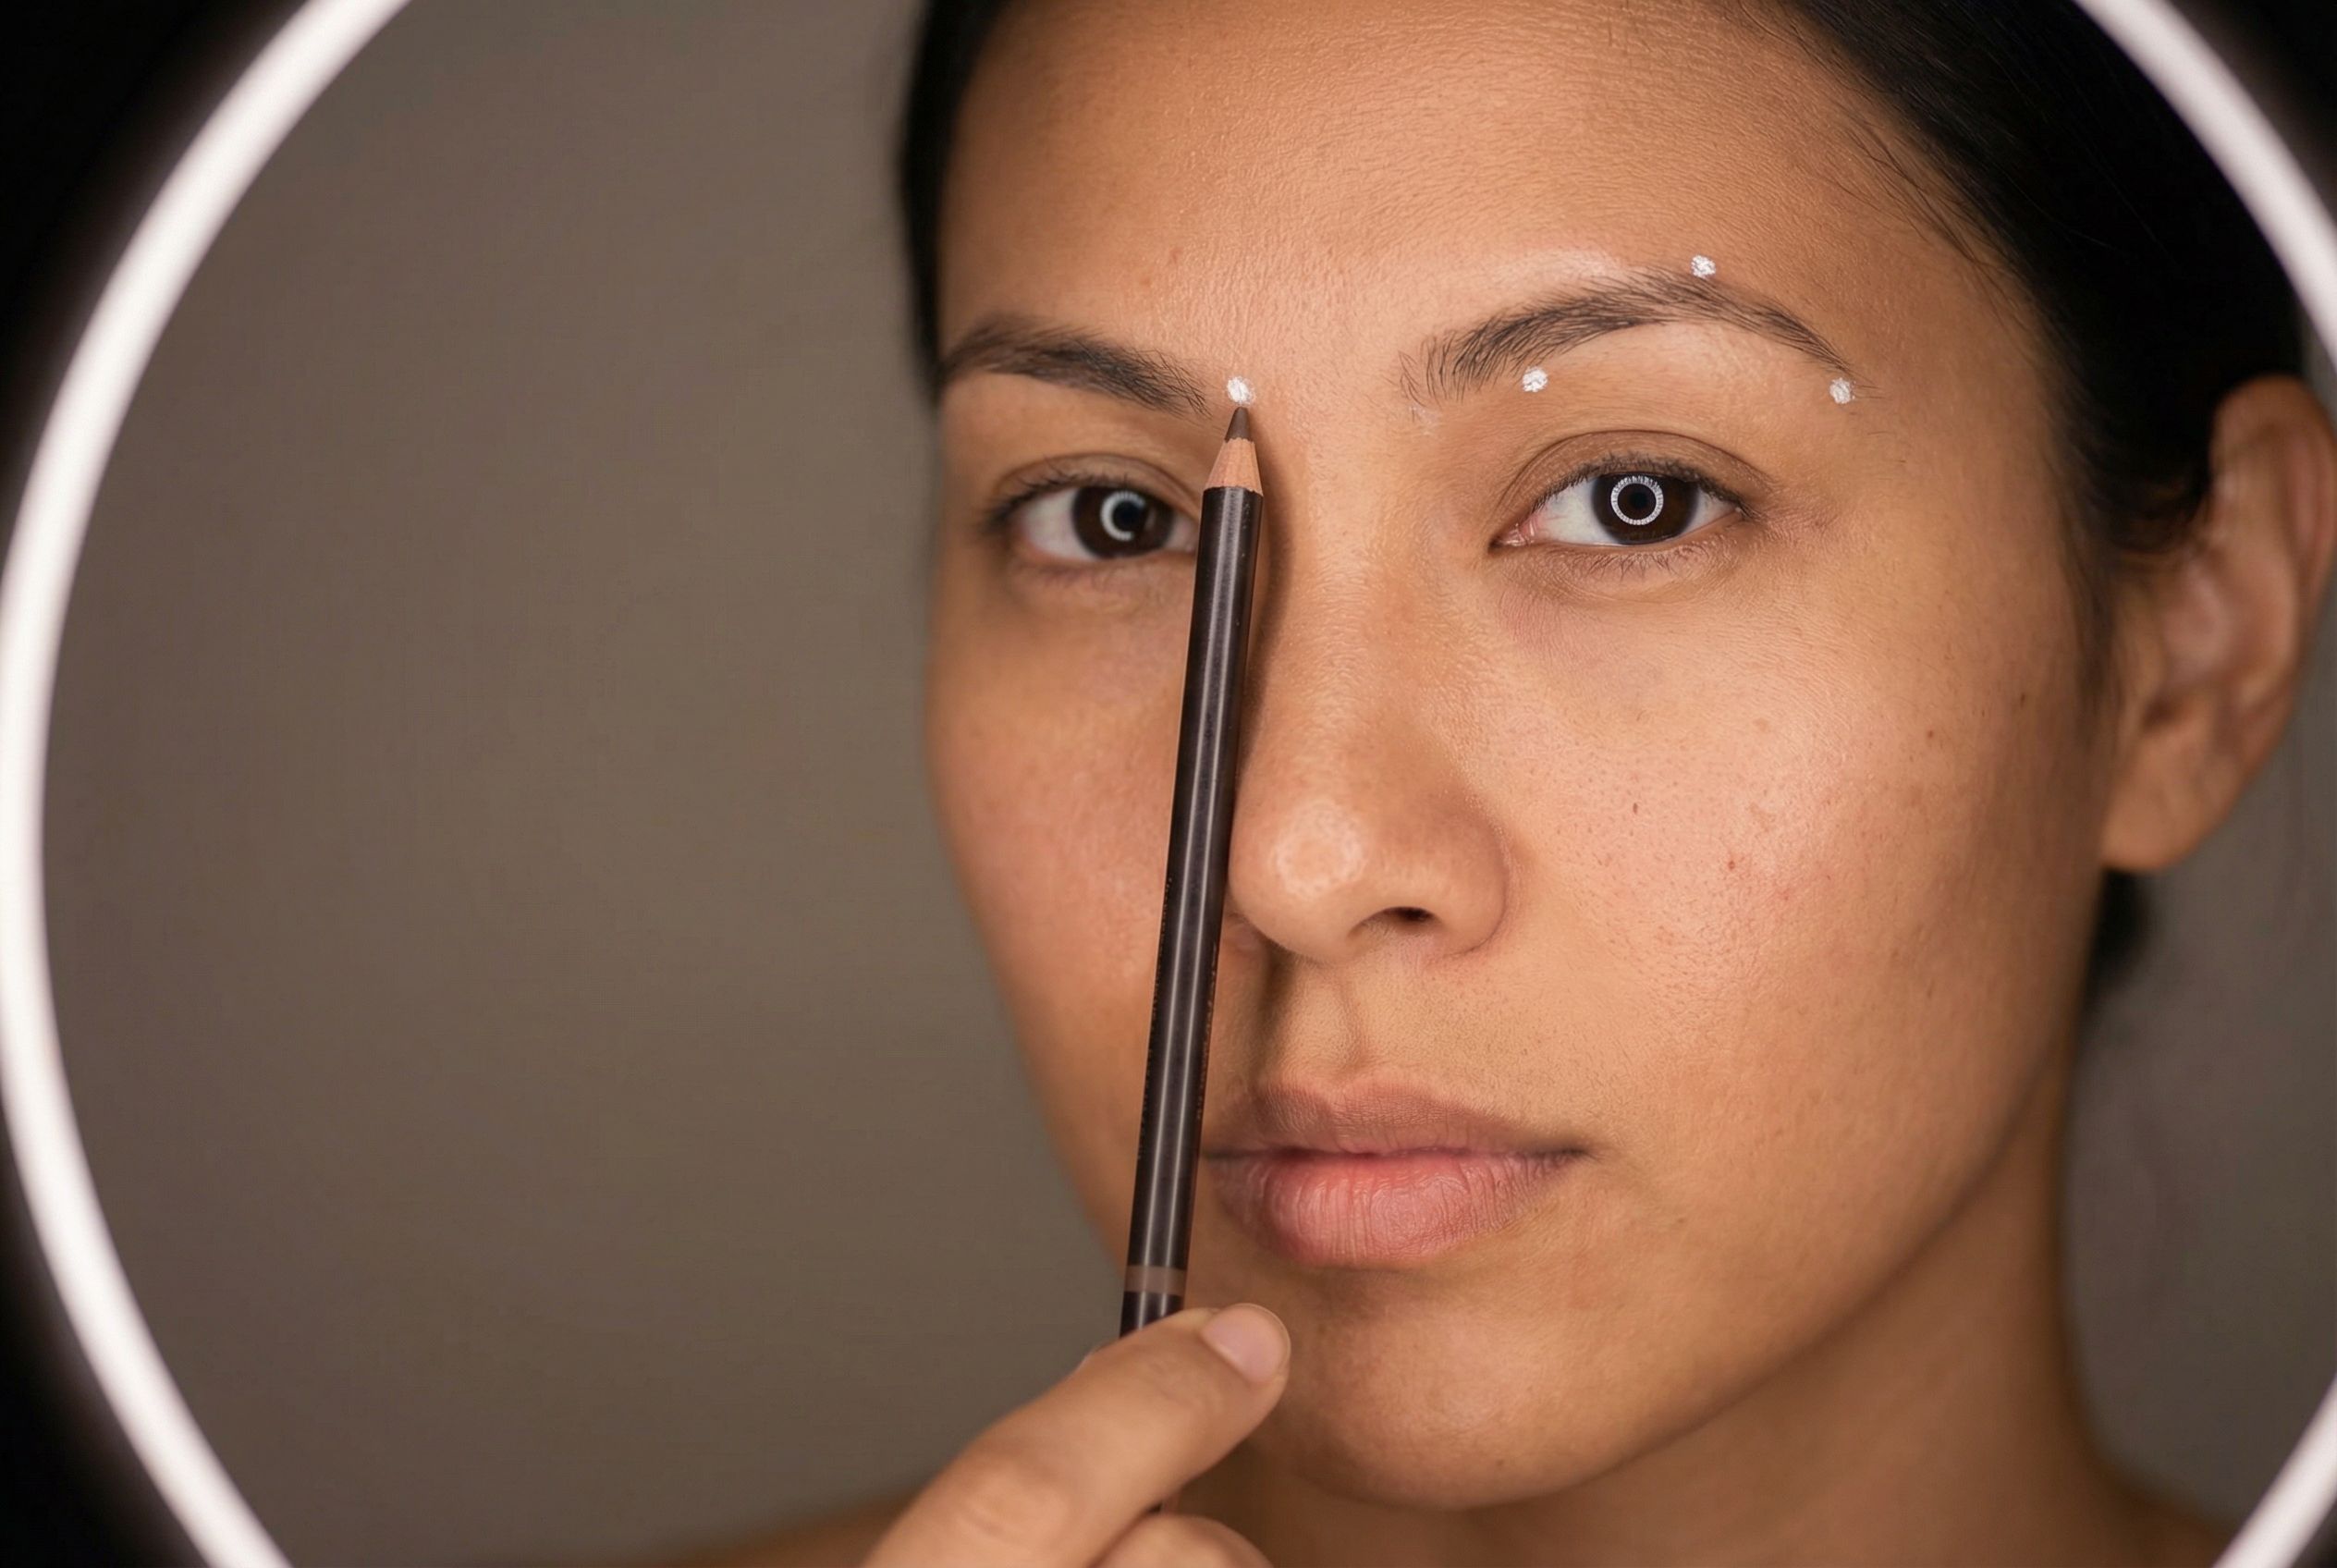
The Pencil Trick
Grab a straight pencil or makeup brush and use it to map your three landmarks:
- Brow head: Hold the pencil vertically alongside the bridge of your nose, pointing straight up. Where it meets the brow line is your starting point.
- Arch: Angle the pencil from the outer edge of your nostril through the outer edge of your iris (looking straight ahead). Where it crosses the brow is your peak.
- Tail: Angle the pencil from the outer edge of your nostril through the outer corner of your eye. Where it meets the brow line is your endpoint.
Mark each point lightly with a brow pencil, then connect them to visualize your ideal shape. This framework keeps your grooming precise and prevents over-plucking.
Brow Shape by Face Shape
Your face shape helps determine which brow style flatters you most:
| Face Shape | Recommended Brow Style | Why It Works |
|---|---|---|
| Oval | Soft arch | Maintains natural balance without adding length or width |
| Round | Defined arch | Adds vertical dimension and slims the face |
| Square | Rounded or curved | Softens strong angles along the jawline |
| Long | Flat / straight | Visually shortens the face and adds width |
| Heart | Soft, rounded arch | Balances a wider forehead and narrow chin |
Your natural brow shape is almost always the best starting point. Work with it, not against it. If you are unsure, a professional eyebrow threading appointment is the fastest way to establish a shape that flatters your features.
Step 2: Define Your Shape with Hair Removal
With your shape mapped, it is time to remove the stray hairs that fall outside the outline. Here is how the main methods compare:
Hair Removal Methods Compared
Threading
- A cotton thread is rolled over the skin to lift rows of hair at the follicle level.
- Pros: Highly precise, fast, gentle on sensitive skin, no chemicals or heat.
- Cons: Requires a trained professional for best results.
- Our pick: Threading is the gold standard for brow shaping. Book threading at Urban Brows.
Tweezing
- Individual hairs are plucked with slanted-tip tweezers.
- Pros: Inexpensive, easy at home, good for maintenance between appointments.
- Cons: Time-consuming, risk of over-plucking, can cause ingrown hairs if you pull against the growth direction.
Waxing
- Warm wax is applied and removed to strip hair in sections.
- Pros: Fast, removes fine hairs.
- Cons: Less precise than threading, can irritate sensitive skin, and may lift skin if you use retinoids or exfoliating acids.
Laser / IPL
- Light energy targets and reduces hair follicles over multiple sessions.
- Pros: Long-term reduction in regrowth.
- Cons: Expensive, not ideal for brow sculpting (too permanent), less effective on light hair.
Tweezing at Home (Between Appointments)
If you are maintaining your shape between professional threading sessions:
- Only target strays. Remove hairs that clearly fall outside your mapped outline. When in doubt, leave it.
- Pull in the direction of growth to reduce irritation and ingrown hairs.
- Work one line at a time. Alternate between brows frequently so you do not over-thin one side.
- Step back and check. After every few hairs, look in a mirror from arm's length to assess symmetry.
Trimming
Long brow hairs can make even a well-shaped brow look unruly. Brush hairs upward with a clean spoolie, then trim only the tips that extend beyond your natural brow line using small, sharp scissors.
Step 3: Fill and Finish with Makeup
This step is optional but makes a noticeable difference, especially if you have sparse areas, gaps, or light-coloured brow hairs. The goal is subtle enhancement, not a drawn-on look.
Choose Your Shade
- Dark hair: Go one to two shades lighter than your hair colour for a natural finish.
- Light hair: Go one to two shades darker than your hair colour to add definition without looking harsh.
- Test a few shades before committing. The right match should blend seamlessly under natural light.
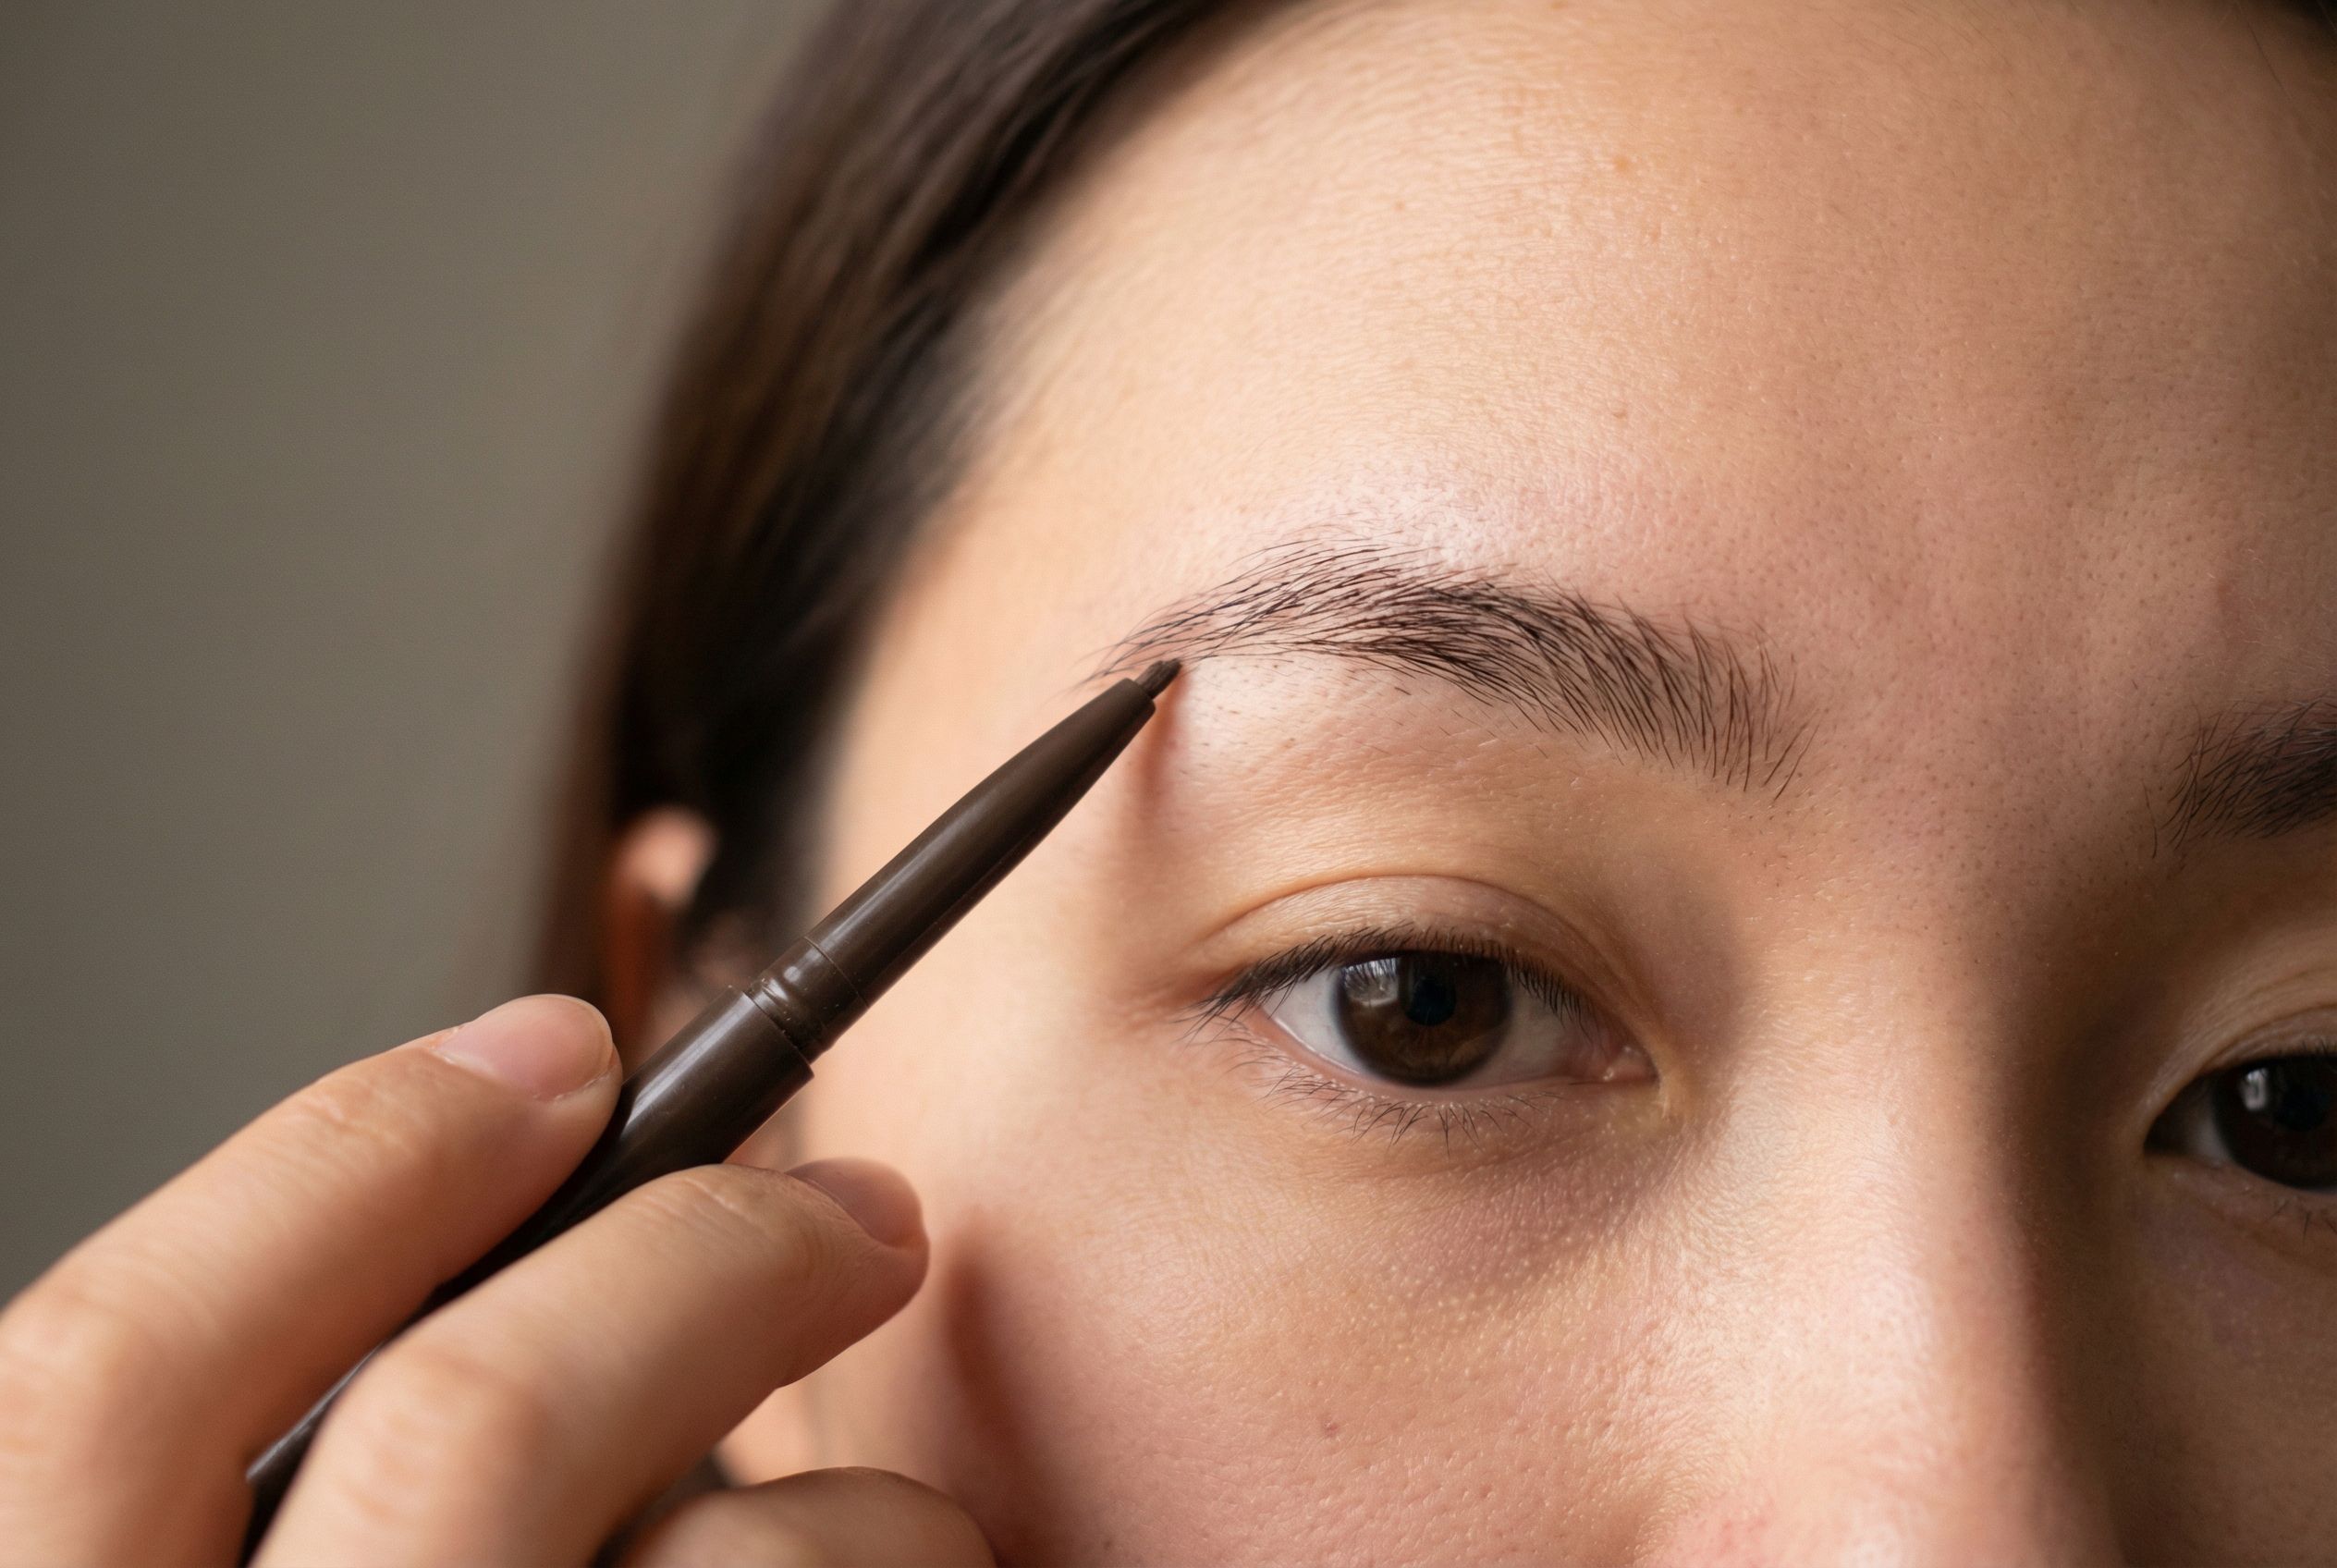
How to Fill with Brow Pencil
- Brush hairs upward with a spoolie to reveal gaps.
- Using a fine-tipped brow pencil, draw short, hair-like strokes in the direction of natural growth.
- Focus on sparse areas and the tail, not the entire brow. Leaving the brow head slightly softer looks more natural.
- Blend with the spoolie to soften any harsh lines.
How to Fill with Brow Powder
- Use a small angled brush to pick up a light amount of powder.
- Apply with gentle, short strokes, building colour gradually.
- Powder works especially well for adding overall density to thin brows without the precision pressure of pencil work.
Optional: Highlight and Set
- Highlight: Apply a matte concealer or highlighter pencil just below the brow's lower edge and blend. This lifts the brow and creates a clean, polished line.
- Set: A clear or tinted brow gel locks hairs in place all day and adds a finished, groomed look.
Want to skip the daily fill routine? Professional services can give you semi-permanent fullness. Brow Lamination lifts and sets hairs for a fluffy, brushed-up look lasting 4 to 6 weeks. Eyebrow Tinting adds colour to light or sparse hairs, reducing the need for daily pencil work. And Henna Brows tint both hair and skin for a naturally fuller appearance. Before committing, preview any of these styles on your face with our AI brow visualizer. Not sure what shape suits your face? Find out with our free AI brow shape analyzer — it maps your face shape and recommends the perfect brow style in seconds.
FAQ
How often should I get my brows shaped?
Most people benefit from professional shaping every 3 to 4 weeks, which aligns with the natural brow growth cycle. Light tweezing between appointments is fine for obvious strays.
What is the best brow shape for beginners?
Start with your natural shape. Use the pencil trick to identify your landmarks, then have a professional thread or clean up the outline. Trying to drastically change your shape at home often leads to over-plucking.
Does threading hurt?
Most people describe it as a quick, zipping sensation that is over fast. It is generally considered gentler than waxing. Read our full guide on what to expect from eyebrow threading.
Should I fill my brows before or after other makeup?
Fill your brows after foundation and concealer but before eye makeup. This lets you blend the brow edges cleanly and ensures the rest of your look is built around your brow frame.
How do I fix over-plucked brows?
Stop all hair removal and let your brows grow for 6 to 8 weeks. Use a brow pencil to fill gaps in the meantime. A growth serum with peptides may help. Once enough hair has returned, visit a professional to reshape from scratch.
Can brow lamination replace daily filling?
For many clients, yes. Brow lamination lifts and sets your existing hairs into a fuller, more uniform shape that lasts weeks. Combined with a tint, it can significantly reduce your morning routine.
Ready for professionally shaped brows? Book your eyebrow threading appointment at any of our four Edmonton-area locations. Most appointments take about 10 minutes.